第一印象
首先拖进gda,看了一下,发现了四个甚至三个检测root
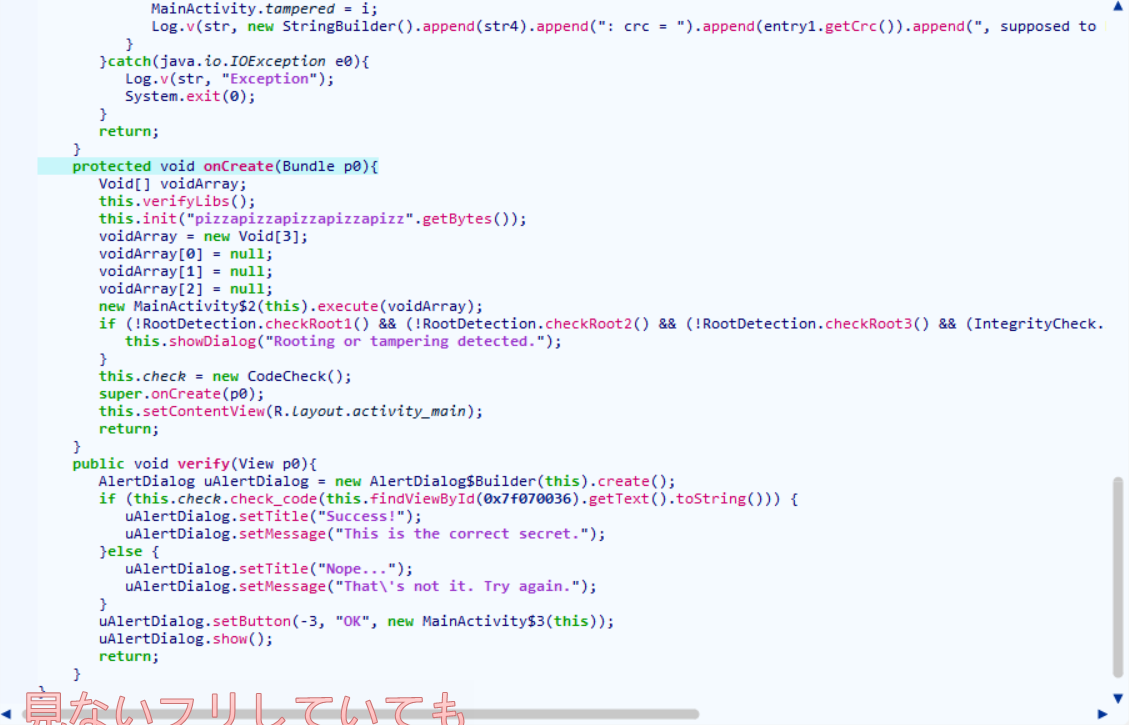

眼前一黑
随后看了一下native

可以看到是一个简单的异或然后比较,异或的key大概是主函数里的放到init的native里初始化的pizza(我去,pizza)


不过这里的异或还有一个数组是未知的,而这个数组它是由一个函数进行初始化的。混淆过的函数
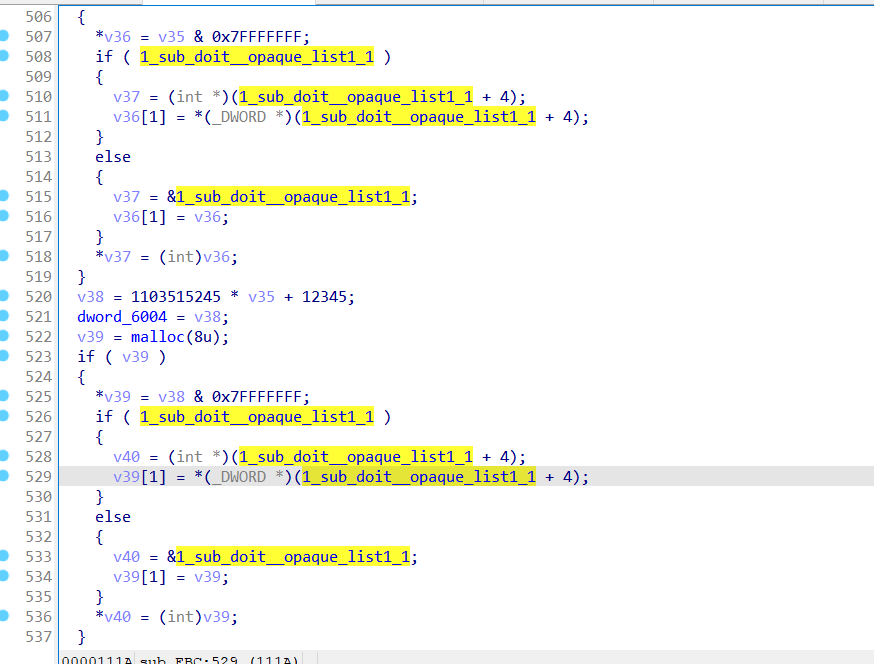
感觉就是直接步过这个函数然后看数组值就行。
同时这里也有和level2一样的native反调试
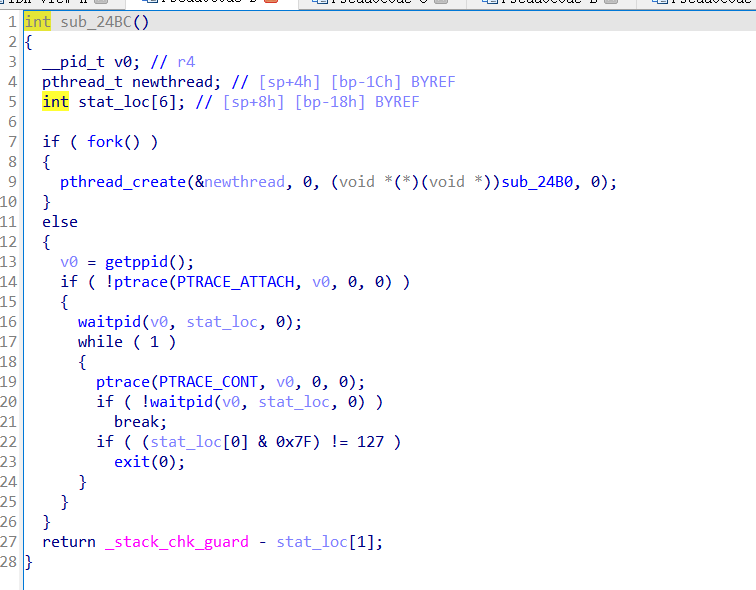
直接用level2代码把exit hook了就差不多过了
个人想法是,java层把那几个checkroot全hook了,返回值恒等于true,然后native直接ida 动态调试提取数组就可以解了。
但是没做,直接看答案了,因为不知道那个类的是不是可以直接hook

看wp后分析
主函数有个verifyLibs,完全没看到(寄

里面是对davlik字节码的检测和native代码的检测,用的是crc32
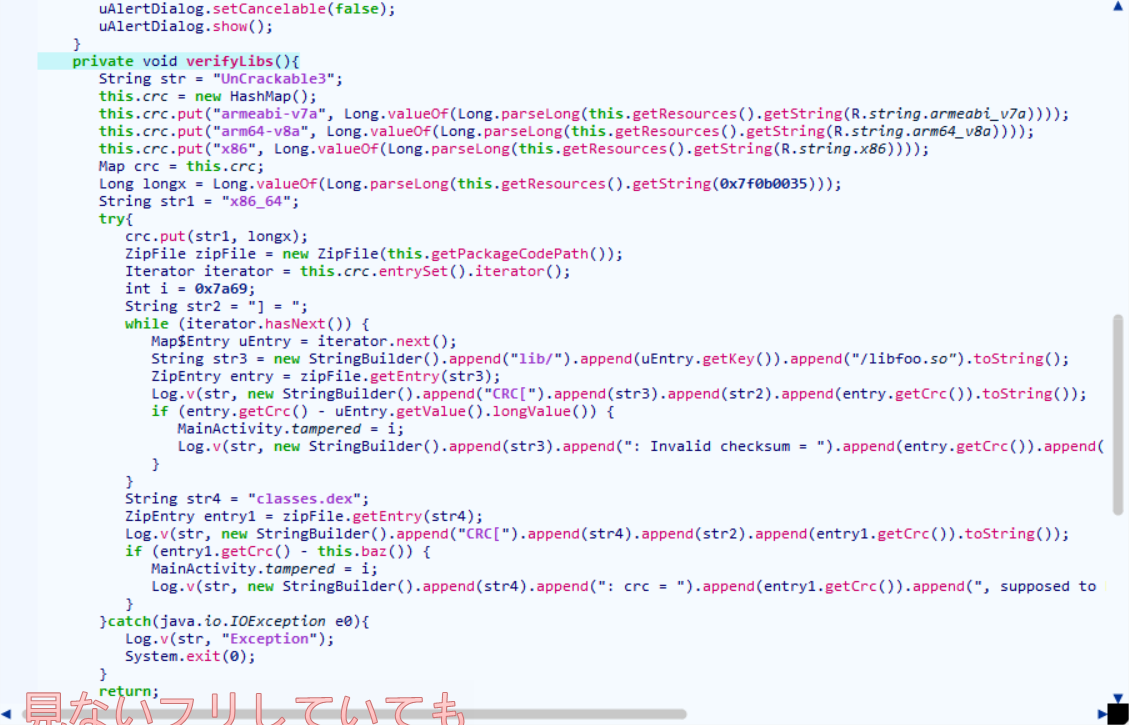
由于整个都是检测,直接pass掉就行,改dailvk代码即可
root检测
总代码
1
2
3
4
5
6
7
8
9
10
11
12
13
14
15
16
17
18
19
20
21
22
23
24
25
26
27
28
29
30
31
32
33
34
35
36
37
38
39
40
41
42
43
44
45
46
47
48
49
50
51
52
53
54
55
56
57
58
| package sg.vantagepoint.util;
import android.os.Build;
import java.io.File;
public class RootDetection {
public RootDetection() {
super();
}
public static boolean checkRoot1() {
boolean bool = false;
String[] array_string = System.getenv("PATH").split(":");
int i = array_string.length;
int i1 = 0;
while(i1 < i) {
if(new File(array_string[i1], "su").exists()) {
bool = true;
}
else {
++i1;
continue;
}
return bool;
}
return bool;
}
public static boolean checkRoot2() {
String string0 = Build.TAGS;
boolean bool = string0 == null || !string0.contains("test-keys") ? false : true;
return bool;
}
public static boolean checkRoot3() {
boolean bool = true;
String[] array_string = new String[]{"/system/app/Superuser.apk", "/system/xbin/daemonsu", "/system/etc/init.d/99SuperSUDaemon",
"/system/bin/.ext/.su", "/system/etc/.has_su_daemon", "/system/etc/.installed_su_daemon",
"/dev/com.koushikdutta.superuser.daemon/"};
int i = array_string.length;
int i1 = 0;
while(true) {
if(i1 >= i) {
return false;
}
else if(!new File(array_string[i1]).exists()) {
++i1;
continue;
}
return bool;
}
return false;
}
}
|
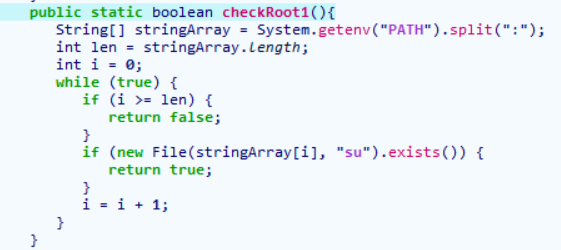
checkRoot1
检测文件系统里有没有名字是su的文件
checkRoot2

这里将Build.TAGS和test-key比较来检测,虽然不是很懂,wp这样说的
1
| 默认情况下,Google 的库存 Android ROM 是使用发布密钥标签构建的。如果存在测试密钥,这可能意味着设备上的 Android 构建是开发人员构建或非官方的 Google 构建
|
checkRoot3
1
2
3
4
5
6
7
8
9
10
11
12
13
14
15
| public static boolean checkRoot3(){
String[] stringArray = new String[]{"/system/app/Superuser.apk","/system/xbin/daemonsu","/system/etc/init.d/99SuperSUDaemon","/system/bin/.ext/.su","/system/etc/.has_su_daemon","/system/etc/.installed_su_daemon","/dev/com.koushikdutta.superuser.daemon/"};
int len = stringArray.length;
int i = 0;
while (true) {
if (i >= len) {
return false;
}
if (new File(stringArray[i]).exists()) {
return true;
}
i = i + 1;
}
}
}
|
检测了一堆危险的root应用程序
init_array段
这个段有着程序启动时首先执行函数的指针,点进去发现pthread_create了一个函数,点进去发现居然还有反调试
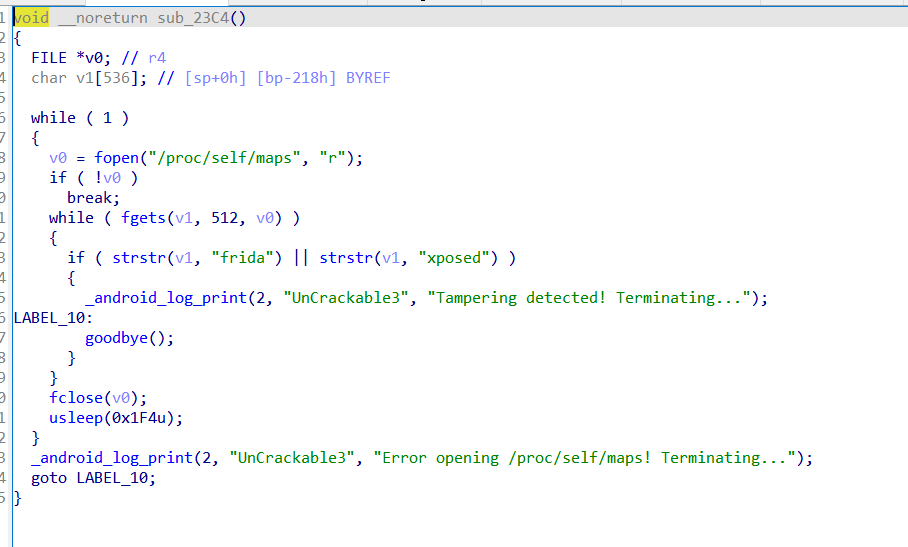
这个倒是好理解,遍历内存查看是否有frida或者xposed字符串
代码自调试
1
2
3
4
5
6
7
8
9
10
11
12
13
14
15
16
17
18
19
20
21
22
23
24
25
26
27
28
| int anti_debug()
{
__pid_t pid;
pthread_t newthread;
int stat_loc;
::pid = fork();
if ( ::pid )
{
pthread_create(&newthread, 0, (void *(*)(void *))monitor_pid, 0);
}
else
{
pid = getppid();
if ( !ptrace(PTRACE_ATTACH, pid, 0, 0) )
{
waitpid(pid, &stat_loc, 0);
ptrace(PTRACE_CONT, pid, 0, 0);
while ( waitpid(pid, &stat_loc, 0) )
{
if ( (stat_loc & 127) != 127 )
exit(0);
ptrace(PTRACE_CONT, pid);
}
}
}
return _stack_chk_guard;
}
|
这段代码就是代码的自调试,因为任何调试器只能附加到一个进程,而附加后的进程无法被其他调试器附加,所以
如果我们在附加调试器的同时运行程序,就会出现两个线程,且应用程序崩了
bypass环节
java层
首先是java层的一大堆checkRoot
触发后会调用这几个函数


可以看到最终是一个exit。这里代表的是点击按钮后退出。所以我们直接hook掉这个exit就可以一下过掉所有java层反调试,这个函数也一样
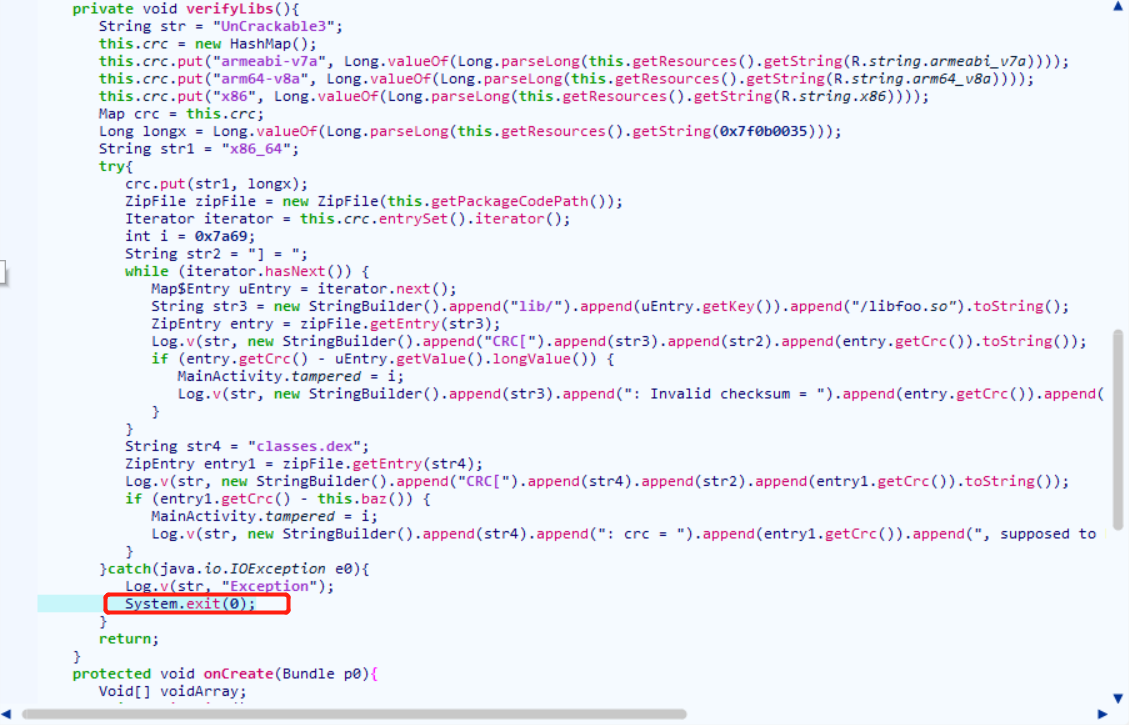
也是调用exit,所以一个hook把java层的反调试全部过掉了
native层
一个pthread hook全部过掉!
这里的pthread作用是开一个新线程,让我们无法spawn上原程序的线程
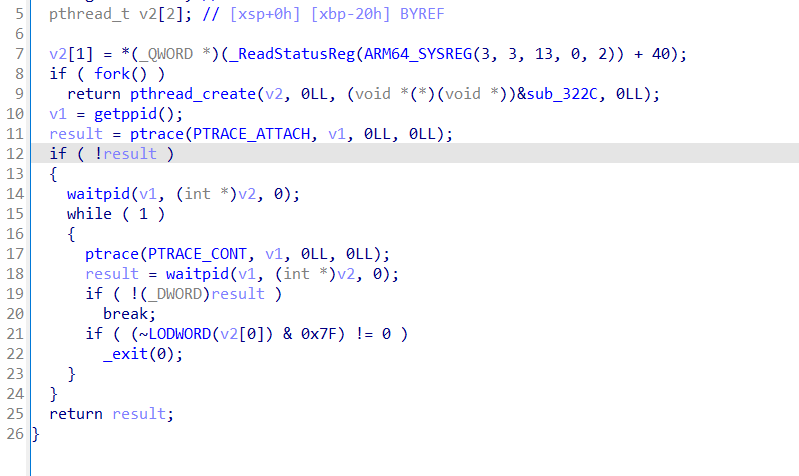
但是我们不开这个线程就没事了
另一个用到pthread的地方,是用pthread开新线程执行这个函数
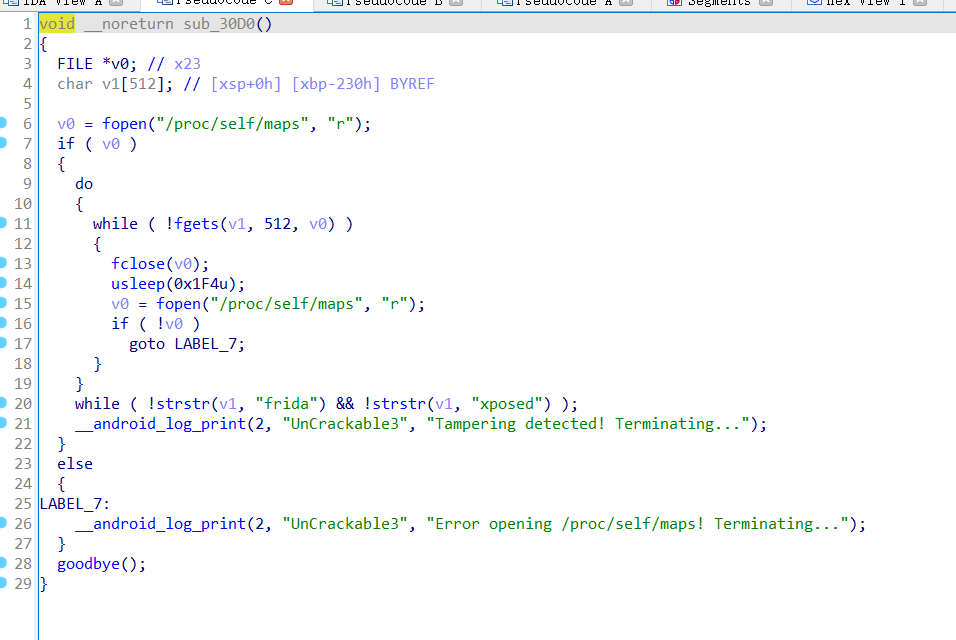
这个显然就是反调试,所以我们连strstr都不需要hook了,直接hook pthread就完事了
临门一脚
啥检测都过了,现在我们需要的是获取这个的返回值
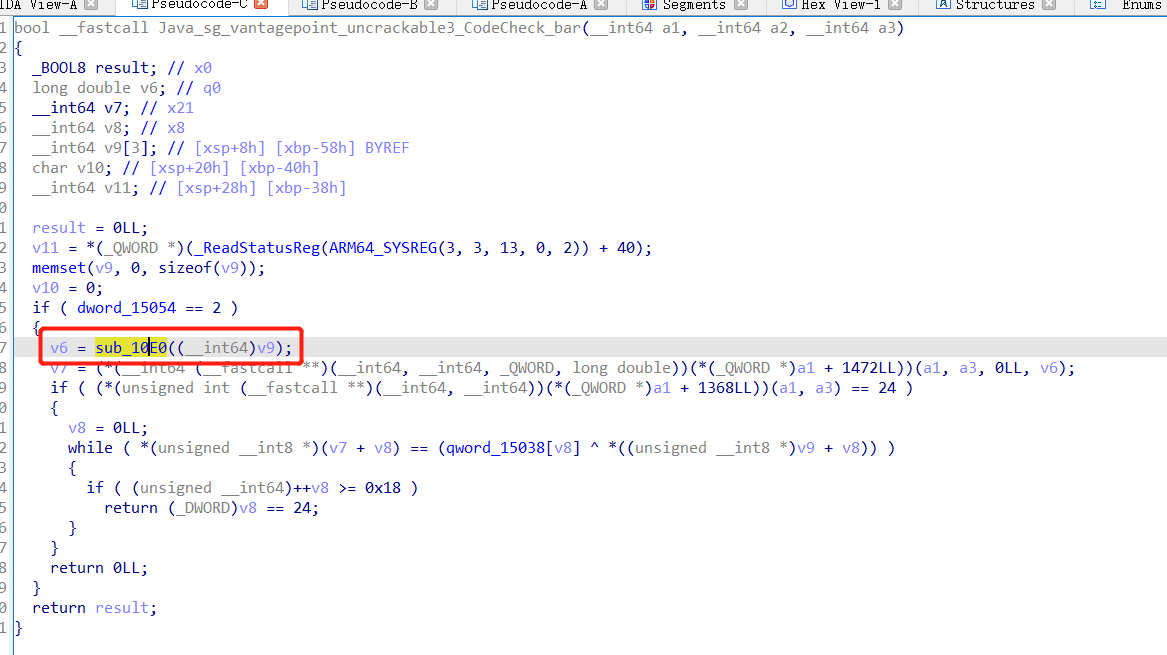
wp里最后的比较是个函数,我这个程序不是,很奇怪。所以我直接hook这个函数获取返回值了。
函数的偏移直接先获取这个so文件的地址然后add对应的地址就可以了
总代码如下
1
2
3
4
5
6
7
8
9
10
11
12
13
14
15
16
17
18
19
20
21
22
23
24
25
26
27
28
29
30
31
32
33
34
35
36
37
38
39
40
41
42
43
44
45
46
47
48
49
50
51
52
53
54
55
56
57
58
59
60
61
62
63
64
65
66
67
68
69
70
71
72
73
74
75
76
77
78
79
80
81
82
83
84
85
86
87
88
89
|
function exit_hook(){
Java.perform(function(){
send("starting to hook exit");
var func = Java.use("java.lang.System");
func.exit.overload('int').implementation = function(args){
send("exit triggered");
}
send("hook success");
})
}
function strstr_hook()
{
Interceptor.attach(Module.findExportByName("libc.so","strstr"),{
onEnter:function(args){
this.getName = args[0];
this.duibi = args[1];
this.check = false;
let getName = Memory.readUtf8String(this.getName);
let duibi = Memory.readUtf8String(this.duibi);
if(getName.indexOf("frida") != -1 || getName.indexOf("xposed") != -1){
this.check = true;
}
},
onLeave:function(retval){
retval = true;
if(this.check){
send("strstr(frida) was patched!! ==> " + Memory.readUtf8String(this.duibi));
retval = false;
}
return retval;
}
})
}
function print_secert(){
var secret_func_offset = 0x10e0;
var base_addr = Module.findBaseAddress("libfoo.so");
if(!base_addr){
send("base addr is null");
return 0;
}
send("[+] find base addr!");
var secret_func = base_addr.add(secret_func_offset);
Interceptor.attach(secret_func,{
onEnter:function(args){
send("into the secret function!");
this.value = args[0];
},
onLeave:function(retval){
var secret_data = hexdump(this.value,{
offset: 0,
length: 24,
header:false,
});
send(secret_data);
}
})
}
function pthread_hook(){
var pthread_create_origin = Module.findExportByName("libc.so","pthread_create");
var pthread_create_replace = new NativeFunction(pthread_create_origin,"int",["pointer","pointer","pointer","pointer"]);
Interceptor.replace(pthread_create_origin,new NativeCallback(function(ptr0,ptr1,ptr2,ptr3){
var retval = ptr(0);
if(ptr1.isNull() && ptr3.isNull()){
send("bypass the pthread");
}
else{
retval = pthread_create_replace(ptr0,ptr1,ptr2,ptr3);
}
send("pthread execute next is print_secert");
print_secert();
return retval;
},"int",["pointer","pointer","pointer","pointer"]));
}
function hook(){
exit_hook();
pthread_hook();
}
setImmediate(hook);
|
结果
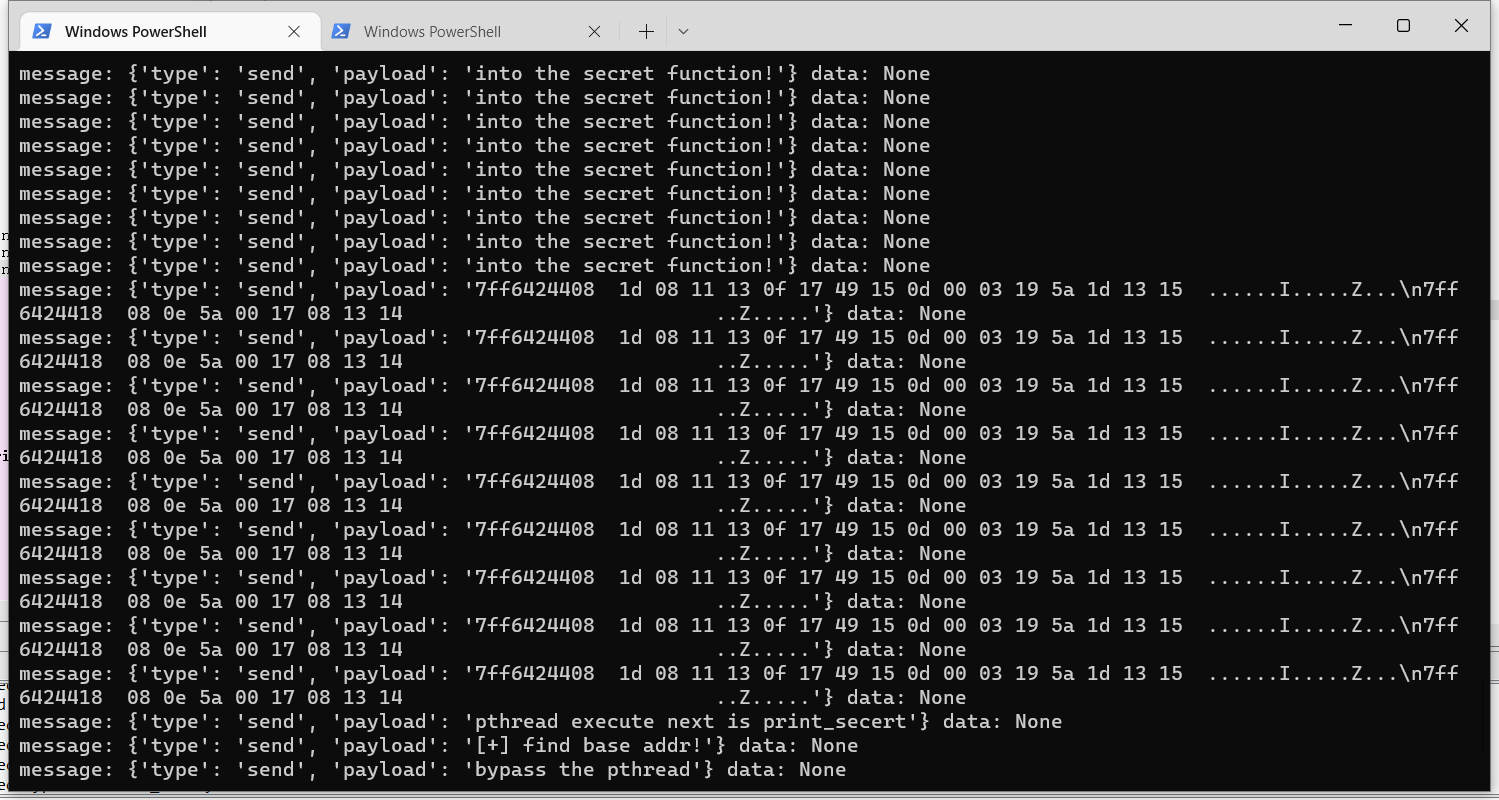
提取出来和init初始化的pizzapizzapizzapizza那个异或的结果就是flag
总结
好玩儿,对frida的hook更加熟练了,包括各种函数的hook,pthread,exit,strstr,也debug了很多,附带了很多思索,很开心


